How to Build an Immersive RealityKit Scene Using the ECS Architecture
RealityKit’s Entity-Component-System (ECS) architecture provides a modular way to build interactive 3D experiences. In this tutorial, we’ll use it to create an immersive scene with a floating brick—showing how entities, components, and systems work together to bring motion and structure to your RealityKit world.
Getting Started
Before we begin, make sure to read my previous tutorial: How to Load 3D Models in RealityKit for visionOS.
This comprehensive guide provides all the essential knowledge required for importing and displaying 3D assets, serving as an ideal foundation for this immersive ECS project.
Now, let’s get our hands dirty!
You can download the sample project from GitHub, and here’s how the project is organized:
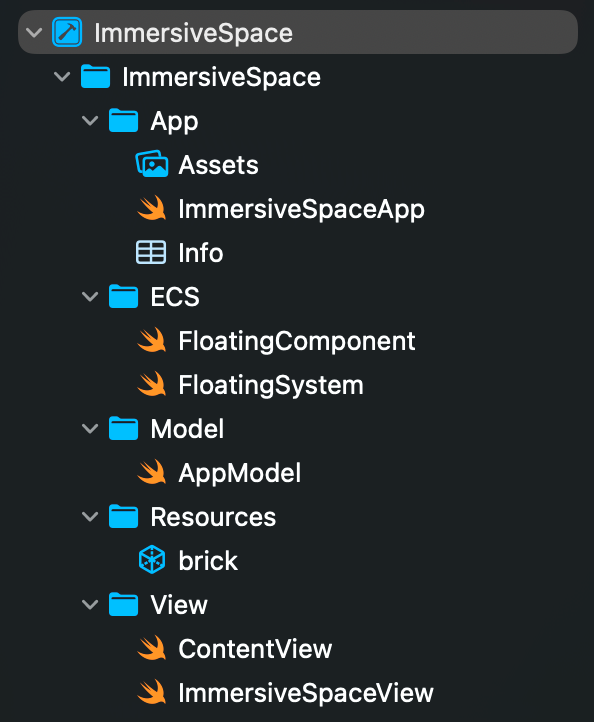
The project is divided into a few simple layers
- ECS: contains the
FloatingComponentandFloatingSystem, which define our floating behavior. - Model: holds shared app state, such as
AppModel. - Resources: stores the 3D model used in the immersive space.
- View: contains SwiftUI views, including the
ImmersiveSpaceViewwhere RealityKit is integrated.
This separation keeps the architecture modular and easy to extend as the project grows.
Introduce the ECS Concept
The Entity-Component-System (ECS) architecture is a design pattern that promotes code reusability and clean separation of concerns by dividing your logic into three main parts: data, behavior, and visual representation.
This makes your code easier to maintain, extend, and scale especially in 3D environments.
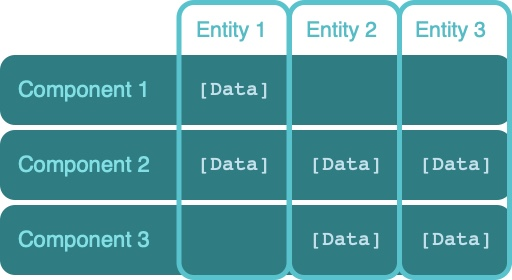
Here’s how it works in RealityKit
- Entities: represent objects in your scene, for example: a brick, wall, or floor.
- Components: define the data or properties of an entity, such as its position, speed, or color.
- Systems: define the behavior; they update entities every frame based on their components.
By applying this pattern, you can organize your RealityKit scenes into modular, reusable building blocks.
If you’d like to explore the ECS pattern in greater depth, I recommend this excellent GitHub resource: ECS FAQ by Sander Mertens
1) Create the Entity
The createBrick() function creates a ModelEntity from our 3D model, assigns it a random material and scale, then attaches a FloatingComponent that defines its movement:
func createBrick() async throws -> ModelEntity {
    let brick = try await ModelEntity(named: "brick")
    brick.model?.materials = [random()]
    brick.setScale(SIMD3(repeating: 0.4 * .random(in: 0.5...2)), relativeTo: brick)
    brick.components.set(FloatingComponent(axis: [
        .random(in: -2...2),
        .random(in: 0...1.5),
        .random(in: -2...0.5)
    ]))

    return brick
}
2) Define the Component
The FloatingComponent stores the data that describes how the brick should move , its speed and current axis position.
struct FloatingComponent: Component {
    var speed: Float
    var axis: SIMD3<Float>

    init(speed: Float = 0.001, axis: SIMD3<Float>) {
        self.speed = speed
        self.axis = axis
    }
}
You can discover more about existing components here: RealityKit Entities and Components – Step Into Vision
3) Implement the system
The FloatingSystem handles the logic that moves the entity.
It queries all entities that contain a FloatingComponent, updates their position and orientation each frame, and adds a subtle floating effect.
final class FloatingSystem: System {
    // 1
    private let query = EntityQuery(where: .has(FloatingComponent.self))

    init(scene: Scene) {}

    func update(context: SceneUpdateContext) {
        // 2
        for entity in context.entities(matching: query, updatingSystemWhen: .rendering) {
            // 3
            var component = entity.components[FloatingComponent.self]!
            // 4
            if component.axis.z > 2 {
                // 5
                component.axis.z = .random(in: -2...0)
            } else {
                // 6
                component.axis.z += component.speed
            }
            // 7
            entity.components[FloatingComponent.self] = component
            // 8
            entity.setPosition(component.axis, relativeTo: nil)
            // 9
            entity.setOrientation(simd_quatf(angle: component.speed, axis: component.axis), relativeTo: entity)
        }
    }
}
EntityQueryhelps us find all entities that have aFloatingComponent.- We loop through every entity returned by that query.
- We extract the
FloatingComponentfrom the entity so we can update its data. - Since our system moves the entity along the Z-axis, we check if it’s moved beyond 2 meters.
- If so, we reset its Z position randomly between -2 and 0.
- Otherwise, we increase the Z position based on the component’s speed.
- We save the updated component back to the entity to store the new state.
- We update the entity’s position in the scene using setPosition.
- Finally, we call setOrientation to rotate the brick around its own axis, adding a nice floating rotation effect.
Constructing the Final Version
Let’s bring everything to life by connecting our ECS setup.
In order for our system to work, we first need to register it using FloatingSystem.registerSystem().
@Observable
final class AppModel {
    private let modelCount = 200
    // 1
    let rootEntity = Entity()

    init() {
        // 2
        FloatingSystem.registerSystem()
    }

    // 3
    func addBrick() async {
        for _ in 0..<modelCount {
            let brick = try! await createBrick()
            rootEntity.addChild(brick)
        }
    }
}
Here’s what’s happening step by step:
- The
rootEntityacts as the entry point or container for all our 3D entities. - We register our custom system, FloatingSystem, so RealityKit can call it automatically during scene updates. Apple Documentation: Registering Systems
- We create 200 bricks and add them to the rootEntity, which will be added to the scene later.
For our SwiftUI view, we simply add the rootEntity to the RealityView:
struct ImmersiveSpaceView: View {
    @Environment(AppModel.self) var model

    var body: some View {
        RealityView { content in
            content.add(model.rootEntity)
        }
    }
}
With this setup, all your bricks will appear inside the immersive space, animated by the ECS system you implemented earlier.
Each frame, the FloatingSystem updates their position and rotation, creating a smooth floating motion in 3D space, You can download the sample project from GitHub
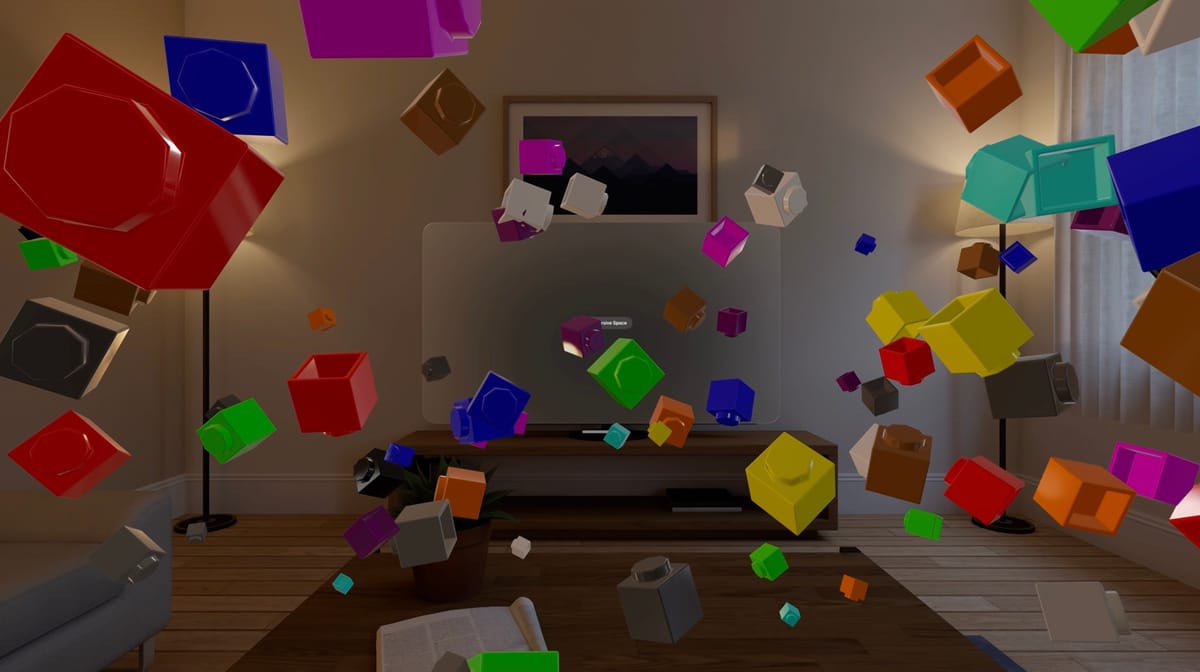
Final Result
Here’s the final result of our immersive RealityKit scene, hundreds of colorful 3D bricks smoothly floating through space, powered entirely by our ECS architecture.
Each brick is driven by its own FloatingComponent, updated every frame by our FloatingSystem, creating this smooth dynamic motion in space
Conclusion
In this tutorial, we explored how to structure an immersive RealityKit scene using the Entity-Component-System (ECS) architecture.
By separating data, behavior, and visuals, we achieved a clean and scalable design, one that makes our scene easy to maintain and extend.
We created:
- a reusable
FloatingComponentto define motion data, - a
FloatingSystemto handle behavior updates each frame, and - an
AppModelthat ties everything together by registering systems and managing entities.
This simple project demonstrates how RealityKit’s ECS model can turn complex scenes into modular, reusable systems.
Reference
- Implementing Systems for Entities in a Scene – Apple Developer
- RealityKit System.registerSystem() – Apple Developer
- SwiftUI Immersive Spaces – Apple Developer
- RealityKit Basics: Entities and Components – Step Into Vision
- You can discover more about components here: Step Into Vision – RealityKit Entities and Components