Age Verification in iOS 26: How to Protect Kids with the DeclaredAgeRange API
Learn how to use the new DeclaredAgeRange API in iOS 26 to build age-appropriate experiences without collecting birthdates, and understand its limitations compared to face-based age checks.
Introduction
Age-gating in apps has long been a challenging balance between safety and privacy. With iOS 26, Apple introduces the DeclaredAgeRange API, a privacy-aware way for developers to build age-appropriate experiences while supporting online protections for children.
This new API lets apps request an age range (like 13+, 16+, or 18+) without ever asking for a user’s birthdate. Apple designed it to help developers adapt content and features responsibly, especially when younger audiences might use an app while keeping parents in control and avoiding the collection of sensitive data.
Getting Started
⚠️ Note: The Declared Age Range framework requires beta software.
- Download macOS 26 (Tahoe) Developer Beta via Software Update
- Download Xcode 26 Beta from Apple Developer
- Available only on iOS 26+
To be able to test you must be enrolled to apple program to use you must be enrolled in the Apple Developer Program
Enable the Declared Age Range Entitlement in Xcode
To use the Declared Age Range framework, your app must include a special entitlement.
As of Xcode 26 beta, the Declared Age Range capability may not appear in the capabilities list, so you’ll need to add it manually.
Here’s how to do it:
- In Xcode, press Command (⌘) + N to create a new file.
- In the template selector, search for “Empty” and choose the one under Other.
- Name the file exactly: [YourAppName].entitlements
- In the entitlements editor, add the key:
com.apple.developer.declared-age-rangeand set the type to Boolean and the value to YES.

Requesting an Age Range
Apple makes requesting an age range simple using either SwiftUI or UIKit. Here’s how you can do it:
Using SwiftUI:
SwiftUI exposes requestAgeRange as an environmental value:
@Environment(\.requestAgeRange) private var requestAgeRange

let response = try await requestAgeRange(ageGates: 13, 16, 18)
Using UIKit:
In UIKit, use the shared service to make the same request:
let minimumAgeForYourApp = 18
let response = AgeRangeService.shared.requestAgeRange(
    ageGates: minimumAgeForYourApp,
    in: self // reference for your UIViewController
)
Verifying the Age:
func checkAge() async {
    do {
        let response = try await requestAgeRange(ageGates: 13, 16, 18)
        switch response {
        case .declinedSharing:
            isValidAge = false
        case .sharing(let range):
            print("User shared age: \(range)")
            if let range = range.lowerBound {
                isValidAge = range >= 18
            }
        }
    } catch {
        print("Failed to determine age: \(error.localizedDescription)")
    }
}
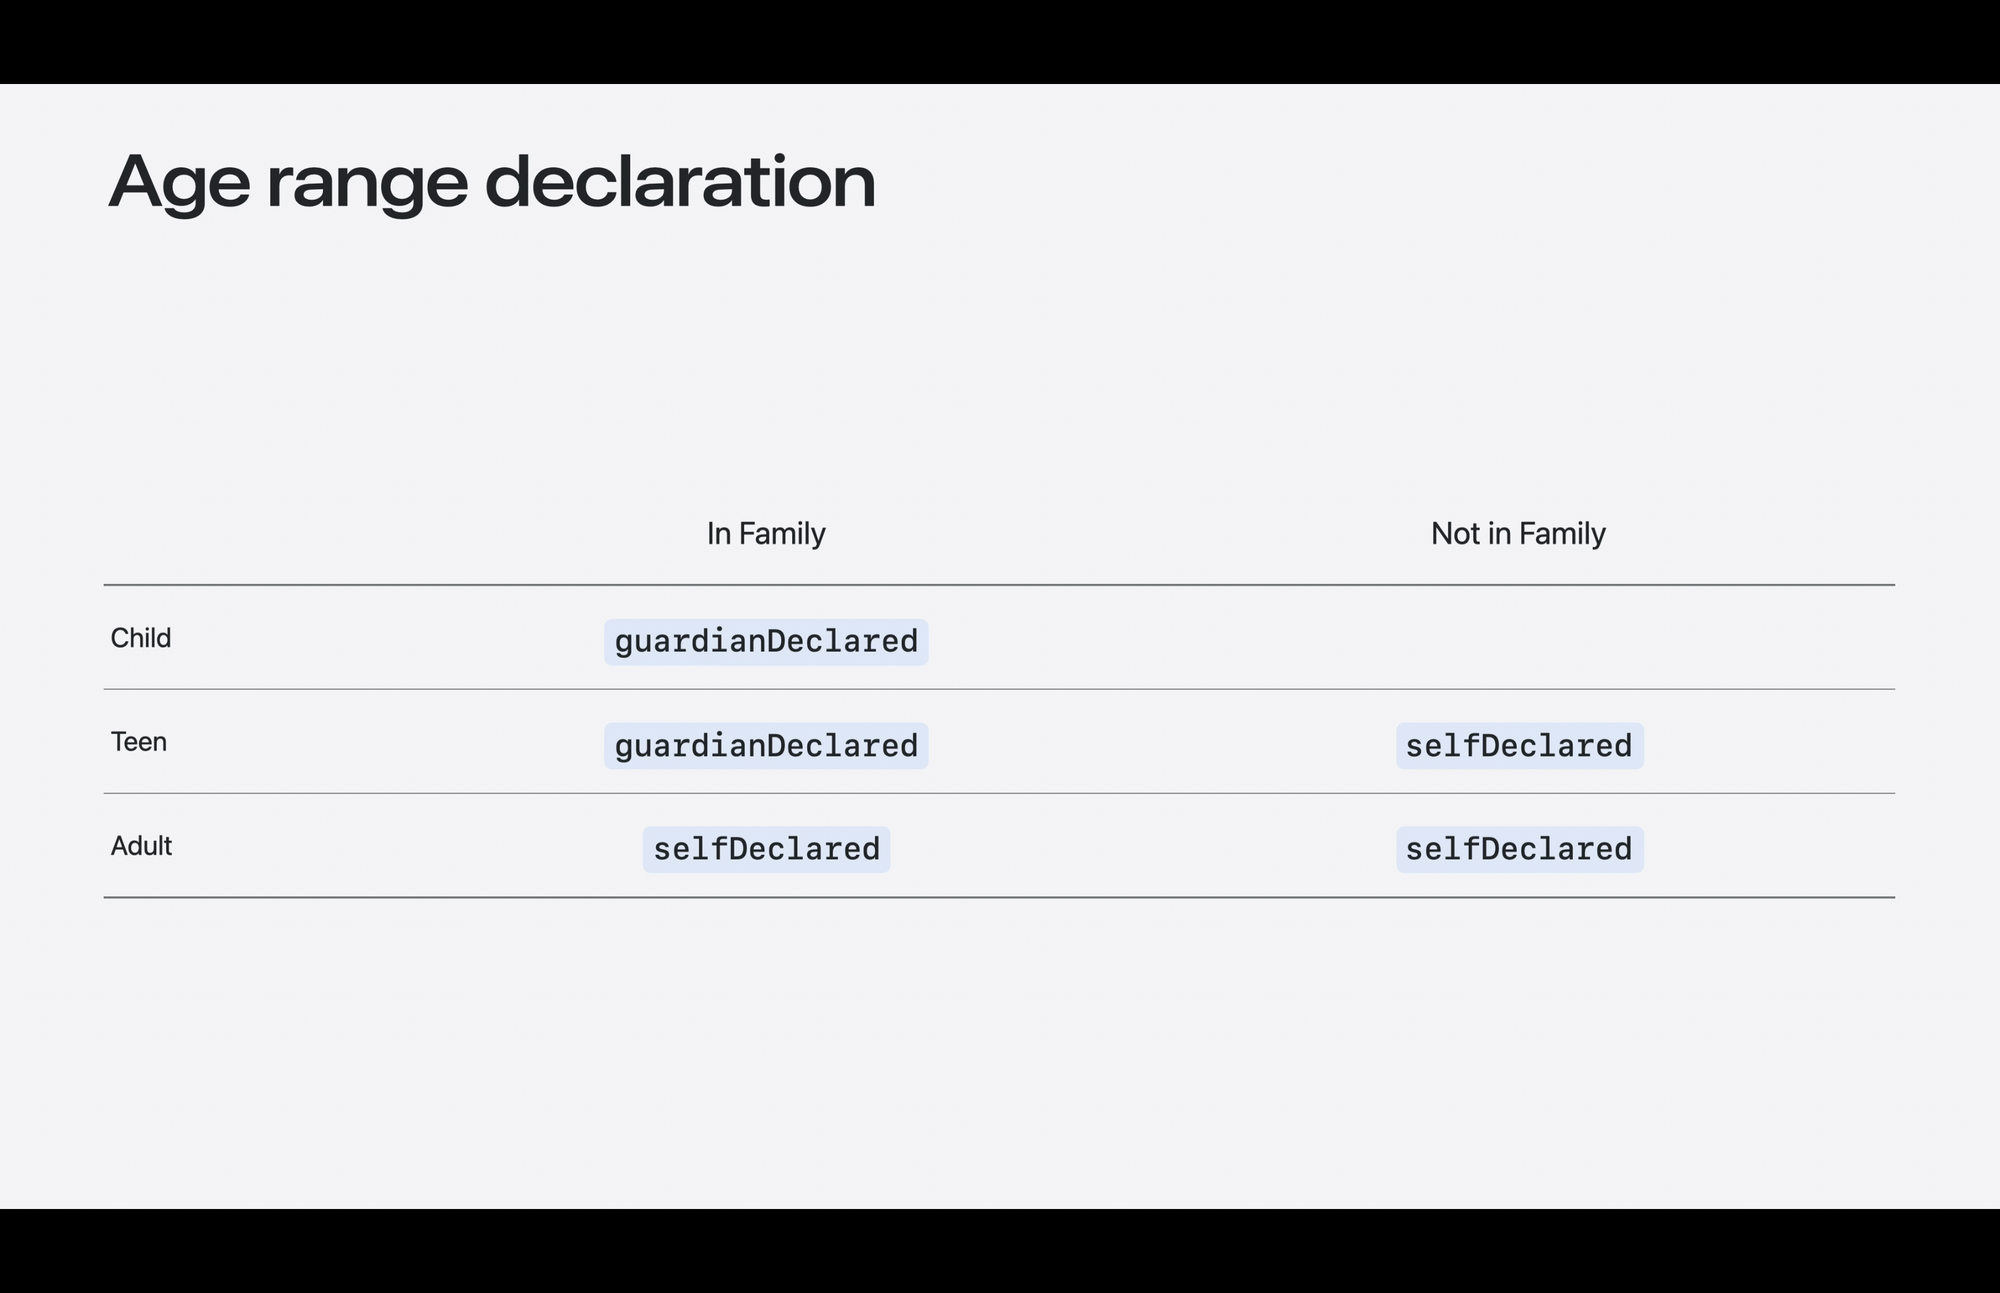
Interpreting the Response: declinedSharing vs sharing:
When users share their age, the system also returns how the age range was declared — either:
- selfDeclared (the user self-reported)
- guardianDeclared (declared by a guardian in a Family group)
Here’s how the source of the age range declaration is determined:
Summary
The DeclaredAgeRange API enables apps to deliver age-appropriate experiences without requiring the collection of birthdates or personal data. It’s simple to implement and integrates with Family Sharing controls.
⚠️ Keep in Mind:
- The API relies on the declared age in the user’s Apple ID.
- If a child enters a false birthdate (e.g., under 13 claiming 18+), it cannot be detected.
- It cannot replace face-based (selfie) age checks.
- Not suitable for high-assurance age verification needs.